Ad

Saturday 25 February 2017

How to use the Ollington St Collection Baby carrier

I have two baby carriers. One is the Evenflo Natural fit baby carrier and the other is the ollington streer collection baby carrier.

I love the evenflo carrier but I cannot make Rani face outwards and see the world.

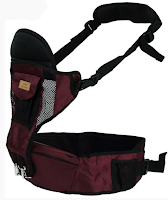
Ollington street collection baby carrier


So I bought this carrier from Ollington street which lets the baby sit facing both inwards and outwards.

So these are the three ways that we can use this carrier:
-Front carrier with baby facing inwards
-Front carrier with baby facing outwards
-Hip carrier

The only issue here is that it has only one, over the shoulder strap. So we need to keep one hand on the baby at all times.

Check out my video below where I show you how to use the ollington st collection baby carrier.


You can buy this carrier here :
Ollington St. Collection Baby Kangaro Carrier - Red

Hip seat baby carrier


In case you are looking for a seated baby carrier with two shoulder straps you can buy it here:

Tollyjoy 5-in-1 Baby Carrier


Also do check out my previous blogs on baby wearing:
What type of baby carrier do you need
How to use the Evenflo Natural Fit Baby carrier


I love hearing from new readers . If you have any queries or suggestions do comment below. You can also connect with me on other social media platforms @perfectoquest


 “Trisha is a participant in the Amazon Associates Program, an affiliate advertising program designed to provide a means for sites to earn ."

Monday 20 February 2017

How to use the Evenflo Natural Fit Baby carrier

I use the Evenflo Natural Fit baby carrier all the time to carry Rani.

Its definitely a life saver.

Back carry

You can use the evenflo natural fit baby carrier im three ways:

-Front carry
With the baby sitting comfortably turning towards you, you can do most of your household work with your free hands.

-Hip carry
This gives a different view for your baby and a shift in weight for you. Baby's weight gets balanced when you want to use only one of your hands for any exclusive work.

-Back carry
This position can be used when you want to have some fun with your baby and also when you want your front to be free.

 Evenflo Natural Fit Soft Carrier, Khaki Orange


Check out my video below to find out how to use the evenflo natural fit baby carrier.

I have shown all the three ways of using the baby carrier.


Do let me know in the comments below if you found this post useful.


I love hearing from new readers . If you have any queries or suggestions do comment below. You can also connect with me on other social media platforms @perfectoquest


 “Trisha is a participant in the Amazon Associates Program, an affiliate advertising program designed to provide a means for sites to earn ."

Wednesday 15 February 2017

What type of baby carrier do you need

Baby wearing has definitely turned into a necessity for us moms and dad especially when you do not have any help at home.

I cannot imagine what I would have done without a baby carrier . It has literally saved me from so much effort in life .
Baby carrier


I use my baby carriers all the time.

Never compromise on the quality because you find something cheaper specially when you have a baby involved.

Why does it matter ?

 A baby's safety always comes first.

If you do not know, hip dysplasia is a major concern in babies.

The below link will give you more details on baby safety.

International Hip Dysplasia Institute

I consider the below 2 carriers as the best baby carriers:

1. Evenflo Natural Fit Soft Carrier, Khaki Orange

This baby carrier provides you three positions
  •  Front carry (baby facing you) 
  •  Back carry and
  •  Hip carry

I use this carrier both within the house and outside. It lets me free my hands while keeping Rani close to me.


2. Ollington St. Collection Baby Kangaro Carrier - Red

This baby carrier has a seat and also provides three positions
  •  Front carry inward facing
  •  Front carry outward facing and
  •  Hip carry
I use this carrier when I have to take her out or whenever I want her to look outwards.

Do check out my video where I also show you the baby carriers that I use.


I love hearing from new readers . If you have any queries or suggestions do comment below. You can also connect with me on other social media platforms @perfectoquest


 “Trisha is a participant in the Amazon Associates Program, an affiliate advertising program designed to provide a means for sites to earn ."

Saturday 11 February 2017

Blog | We went shopping for my little valentine on her first trip to the mall

Rani has never been to a mall. So I thought why not take her out and buy something for her for valentines day.

After all valentines day is around the corner and this is valentines week !!

My little valentine


I was definitely apprehensive the whole time. We can never tell about a baby's mood right.

So I packed my new diaper bag with all the essentials and left for the mall.

I put Rani in her baby carrier . Covered her up with a shawl and took her out to her first experience at the mall.

Well , thats not all!!

She got to taste ice cream too for the first time.

Now , dont jump to any conclusions.  I only let her taste it for one time. That's all. And I could tell that she really loved it!!

Want to see for yourself??

Check out my video here .


I love hearing from new readers . If you have any queries or suggestions do comment below. You can also connect with me on other social media platforms @perfectoquest

Friday 10 February 2017

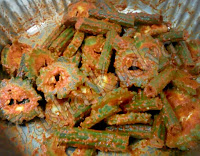
Cooking | How to make Drumstick fries and bitter gourd fries

Today's recipe is one that is a favourite in our house. Drumstick and bitter gourd fries.

Perfect on a cold day or night . Eating it along with rice and dal will give you a complete meal.

Yes, bitter gourd is bitter but that is not a problem .
Marination is key!

Drumstick and karela fries


The recipe we use for these fries is very simple and easy to make.

Ingredients:
- 1 cup oil
- chopped drumsticks (3 to 4)
- chopped bitter gourd(1 medium sized)

You can fry them separately of course. Bur since we use the same recipe for both I have put them in the same list.
The below Iingredients are to be used as per your taste or liking. Reduce the chilly powder if you don't like it spicy Or increase it if you like it too soicy.

 - 3 tbsp Chilly powder 
 - 1 and half tbsp salt
 - 4 to 5 tbsp rice flour
 - 3 to 4 tbsp rava
 - hing/asafoetida (If powder then 2 tsp)
(If it is in solid form then mix 1 tbsp water with a pinch of hing in a bowl and keep it aside)

Method:

  1. Chop the drumsticks and bittergourd .
  2. Add chilly powder,salt and hing water or hing powder to this.
  3. Let it marinate for half an hour or more.
  4. In a container mix the rava and rice flour together.
  5. Sprinkle it on the marinated drumsticks and bitter gourd. (You can also do it the other way round by dipping the drumsticks or bitter gourd into the flour and rava mixture. )
  6. Take oil in a deep bottomed pan and bring it to boil.
  7. Reduce the heat and carefully drop the coated drumsticks and/or bitter gourd.
  8. Fry them on both sides.
  9. Take it off the heat and serve.


Do check out my video where I show you how to make drumstick fries and karela or bitter gourd fries.


Let me know in the comments if you liked it or if you have tried it.

I love hearing from new readers .
If you have any queries or suggestions do comment below.
You can also connect with me on other social media platforms @perfectoquest 

Tuesday 7 February 2017

Blog| Panasonic Hand Blender MX SS1 Review

Rani has started solids now or maybe I should say semi solids ? They are all pureèd stuff.

We started with bananas at first . And slowly started including rice water and dal water in her baby diet list.

Now we wanted to start feeding rice , vegetables , other fruits.

But , there was a problem.

We cant use a big mixer grinder for small quantities of food and its a hastle to clean it daily.

So , guess what!

My search for the perfect hand blender ensued.

Now , there are a lot of blenders in the market.
Some are coated with plastic and some are stainless steel.

So my considerations before buying were:

  1. It should be powerful. Do its job well.
  2. I should be able to use it in hot food or directly in the pan.
  3. It should be easy to wash
  4. It should be easy to use.

I finally found the perfect blender I was looking for :

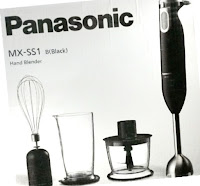
Panasonic Hand Blender MX SS1

Hand Blender from Panasonic


It also came with chopper and whisk attachments , plus a wall mount !!!

This hand blender has a power of 600W and can be used for juicing , making pureès , soups and for mashing food.

The beater can be used for beating eggs, cake batter, dosa batters etc.

The chopper can be used just like a mixer grinder for making quick chutneys and pastes.

And since it is made of steel it can also be used directly in the pan. 

Well I am definitely happy with this purchase and I have recorded a video with my review.

Check out my youtube video below where I show you the unboxing of my new Panasonic Hand Blender MX-SS1 :


You can buy it from the below link on Amazon :
Panasonic MX-SS1 600-Watt Hand Blender (Black)


If you do not want the additional parts and only the blender then you have the option to buy the other version :


Do mention in the comments below if you are planning to buy it or if you would like to suggest it to someone.

I love hearing from new readers . If you have any queries or suggestions do comment below.
You can also connect with me on other social media platforms @perfectoquest


“Trisha is a participant in the Amazon Associates Program, an affiliate advertising program designed to provide a means for sites to earn ."

Wednesday 1 February 2017

Cooking | How to cook Dalitoy or simple dal tadka (yellow lentils)

Dalitoy is a favourite in our house and if you are from a GSB konkani family then you have most likely eaten it and loved it !

It is not only delicious but nutritious as well , so what are you waiting for ? Go ahead and include it in your diet.


Today I will give you our recipe of dalitoy which is very simple and very tasty at the same time.

Before you start , check out my previous page ,where I tell you how to cook and freeze dal.

Ingredients:

- 2 laddles cooked dal
- water (atleast 2 glasses)
- 4 to 5 slit green chillies

For the seasoning:

- 2 tablesooons ghee or oil
- 1 tablesooon mustard seeds
- a few curry leaves
- dried round red chillies
- dried long red chillies
- hing or hing powder (asafoetida)

You can also use the cooked dal straight away. If you do ,then skip the first two steps below.

Method :
  1. Keep the frozen dal outside and wait for it to return to room temperature.
  2. Take 2 ladle full of this dal in a container
  3. Dilute it with as much water as you prefer. I have added one and half glasses of water .
  4. Place it on the stove top.
  5. Add green chillies and salt.
  6. Once boiled you can check if you want to add more water. You can make it as thin as you like. 
  7. Keep it aside.
Seasoning:

Take a bowl and add a pinch of hing and add 2 tablespoons of water to this . Mix well. (If you are using hing powder then skip this step)
  1. Place your tadka pan on the stove top.
  2. Add ghee.
  3. Add the mustard seeds and wait for it to splutter.
  4. Once it splutters add the red chillies.
  5. Add the curry leaves. (If you are using hing powder add it now)
  6. Raise your pan above the gas and switch off the gas.
  7. Next add the hing water. 
  8. Take this pan and add it directly to the dal.
Your delicious dal is done.
Eat this with rice,chapatis or rotis. 


You can buy the tadka pan/ seasoning pan which I use here :

Prestige Hard Anodised Cookware Tadka Pan, 130mm, Black

Check out my video below where you can see how we make dalitoy :


I love hearing from new readers . If you have any queries or suggestions do comment below.
You can also connect with me on other social media platforms @perfectoquest

 “Trisha is a participant in the Amazon Associates Program, an affiliate advertising program designed to provide a means for sites to earn ."

Cooking | How to cook dal (Yellow lentils) and freeze it for later use

Are you a working mom or a working dad or somebody who is very busy , who loves to cook. But you don't have the time or patience to cook ?

Don't worry ! Of course you can order from outside or do some instant cooking with those ready to eat packets you buy in the mall.

Or..

You can think of semi instant cooking ideas like the one I mention in this blog.

All you need to do is half the cooking for your favourite dish. Chuck it in the freezer and use it as and when you crave for it.

You need to spend some time on atleast one day in a week to make something which can be used throughout the week or maybe even more!

Bulk cooking helps reduce a lot of your work and makes life much easy.

Trust me.

There are so many things you can bulk cook and store in the refrigerator or freezer .

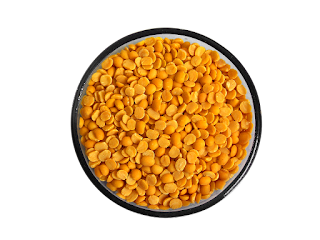
Toor dal or yellow lentils is one such item which can be cooked in bulk and stored for the whole week.

Dal yellow lentils


Whats more?

Toor dal is very nutritious for you.
And once you have cooked it you can use it in any recipe you choose.

To do this you need :

- 1 glass/cup/pav toor dal
- 2 glasses of water
- 1 tsp turmeric powder


Method:
  1. Take one glass of toor dal and add it into your steel container.
  2. Wash it well nd add two glasses of water.
  3. Cover it with a lid .
  4. Take your pressure cooker add around 2 to 3 cups of water and place the cooker plate.
  5. Place the container with dal inside the pressure cooker on top of the plate.
  6. Place the pressure cooker on the gas stove and switch on the gas.
  7. Keep the flame on high .
  8. Wait for the steam to start coming out and then put the whistle cap.
  9. Wait for one whistle on high heat.
  10. Next reduce the heat and count six whistles on low heat.
  11. Switch off the gas.
  12. Wait for ten to fifteen minutes so that the pressure cooker cools down a bit.
  13. Remove the cooker whistle cap.
  14. Open the lid and take out your cooked dal.
  15. Mix it well with a laddle or a beater.
  16. You can directly use this cooked dal for your dish or transfer the contents into a freezer safe container and place it in the freezer.


You can buy the pressure cooker which I use here:
Prestige Deluxe Plus Hard Anodized Outer Lid Pressure Cooker, 5 Litres, Black


Check out my video below where I show you how to cook dal.


I love hearing from new readers . If you have any queries or suggestions do comment below.
You can also connect with me on other social media platforms @perfectoquest


Image credits : www.pixabay.com

 “Trisha is a participant in the Amazon Associates Program, an affiliate advertising program designed to provide a means for sites to earn ."